Feeding a program onto the Arduino IDE system is easy as long as you understand the Arduino syntax system.
Also, Arduino features a vast library you can rely on; hence there are already existing codes you can use.
But primarily, there are some rules you need to follow when making an Arduino Sketch.
In addition, for the code to work, it must be in the appropriate programming language.
In this guide, we’ll explore how to accurately input lines of code to Arduino IDE and realize an executable output.
Table of Contents
- What is Arduino Syntax
- What is an Arduino program?
- Syntax Elements in Arduino Programming
- Variables in an Arduino Program
- Arduino Arithmetic Functions
- What is a Pin Mode declaration?
- FAQs
- Summary
What is Arduino Syntax
An Arduino Syntax is a set of rules you must follow when creating a program on the IDE platform.
It’s, therefore, akin to the grammatical rules you must adhere to when writing an English essay.
Failure to implement the Arduino Syntax input conditions means the resulting code will not successfully realize the desired output.
Through reviewing several code examples, we’ll see below how every aspect of code is essential in Arduino Programming.
What is an Arduino program?

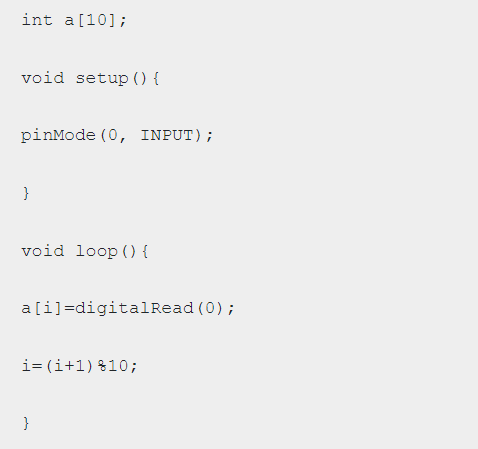
Example of a code.
It’s a set of instructions in the embedded C language that the Arduino IDE executes to realize an output.
Also called a sketch, every Arduino program or code must fundamentally feature two main functions. These include the
- void loop()
- void setup().
The two above functions are the default/ original codes you’ll see on your IDE before you input an additional code block.
Void Setup
The void setup function is imperative in making declarations on the Arduino.
Nonetheless, the function, in this case, doesn’t return an output after execution, given it features the preceding word ‘void.’
The void setup () is primarily also necessary in initializing pin modes. It resets after you begin inputting codes into the Arduino.
Void Loop
On the other hand, the void loop provides the environment for executing the Arduino codes. The name ‘loop’ suggests that the code will run indefinitely.
For instance, if you’re running a simple blink program, the code in the loop will run indefinitely from when you power it to when you switch it off.
Syntax Elements in Arduino Programming

Syntax Complex Development Software Program Concept.
Every aspect of code for Arduino must involve the following syntax elements. Hence, its imperative to understand each for an accurate programming code structure.
Functions
A function in Arduino is a code block featuring numerous codes accumulated in one.
Therefore, like in any programming, the execution of code begins when you input an appropriate function without errors.
The rule of thumb is to enclose the multiple lines of code that make up a function in curly brackets ‘{ ” }.’
Spaces
Leaving a black space (white space) before inputting the Arduino code is innocuous, as Arduino has a mechanism of returning a result even with a space.
Ideally, the spaces preceding a piece of code aim to ensure easy reading.
Therefore, leave two spaces at the beginning of conditional statements, loop function, and function definition.
Also, any spaces you leave in commas, parentheses, and blank lines are harmless to the code.
It means that the Arduino function declaration will be successful even in the presence of the spaces.
Parentheses ( )
As illustrated earlier, these are imperative in indicating functions such as the Void loop and Void Setup.
Hence, if you intend to introduce parameters to either of the functions, you do it within the two parentheses.
Another critical function of parentheses is in mathematical operations, which enables changing the order of calculations.
Tools Tab
When coding, it is crucial to check once in a while whether you’re adhering to syntax.
The tools tab will come in handy as it aids in compiling the code you have uploaded.
SemiColon

Semicolon.
Earlier, we mentioned that programming on Arduino is in C-embedded language.
Therefore, using a semicolon on Arduino is akin to its application in C and C++; as a statement terminator.
So what is a statement? It’s any line of code that has complete instructions by itself.
A terminator shows where the statement ends to aid the operation of the code compiler.
The statements will be mixed up without semicolons, resulting in an error output.
Preferably, write each statement on its unique line and separate it from the next one with a semicolon. It will improve clarity.
However, note that using the semicolon after the void setup and loop curly brackets is not a requirement for a successful output.
#define
This command is imperative in granting a variable to a constant in a code.
However, a semicolon shouldn’t succeed in a #define command to avoid an error in the output.
But this will leave you wondering exactly what a variable and constant are in a code. Check out the example below.

In the above example, the variable is ‘a’ while ‘3’ is the constant. Hence, the variable denotes the name, while the constant is the actual value.
#include<>
Are you looking to input additional library files to your code? Then you’ll need to use the #include<> command.
The idea is that this command assists you in accessing the code blocks outside your Arduino premade Library.
Therefore, the library manager command allows you to use more functionalities for output devices, such as modules and sensors.
Check out an example of its application in an actual Arduino Code.

In the above sketch, the #include<> command brings the SoftwareSerial library into the fold.
Block comments /* */
The role of this command is to introduce notifications for a code snippet (comments).
Therefore, its aim is primarily to introduce more clarity to your code. Writing block comments is simple; you only need to start with a /* and end it with a */ marker, as illustrated below.

Comment //
Take a case where you need to make a single-line comment. You simply need the Comment // command. Here’s an example of its application.

Curly braces {}

Curly Braces
As we mentioned earlier, curly braces encapsulate lines of code, making up a function, as shown below.

You must always include a closing curly brace to any line(s) of code that you start with an opening curly brace.
Variables in an Arduino Program
What are the commonest data types that we use in Arduino? Let’s find out below.
Integers (Int)
Integers can store a varying amount of numbers depending on the Arduino version that you’re using. For instance, say that you have an Arduino Uno board.
Such a board has an integer capacity of 16 bytes (for 2-byte) integer values.
On the other hand, suppose you have an Arduino Due board; this one has a higher integer capacity than the Arduino Uno.
It can hold 32-bit values for 4-byte integer values. Moreover, an Arduino integer can hold negative numbers, although this requires complementary maths.
On the other hand, an integer that features only positive values is called an unsigned int. ‘Int’ is the short form for integer.
Character (Char)
It’s a data type whose primary role is to store characters. Its size is 8 bits, and it can also store characters in numbers form.
This mode is called the ASCII numbers system. For instance, we can represent the letter A using the ASCII value 65.
Also noteworthy, the character value of a particular character outputs itself. Check out the example below for clarity.

Float
Thirdly, we have the float data type, which is imperative in storing decimal numbers.
A float features 32-bit storage and is renowned for its larger resolution than integers.
Float values are between -3.4028235E+38 and 3.4028235E+38.
Bool
Lastly, we have a Bool that fundamentally stores true or false values. Therefore, it occupies a relatively small space- 1 byte. Check out its example in a code.

Arduino Arithmetic Functions
Arduino also provides you with a platform to perform arithmetic operations. Below, let us explore the various arithmetic functions.
Multiplication
As its name suggests, the function is primarily valuable for multiplying two integers/numbers.
To apply it, you need to input the following syntax: value1 *value2;
Remember, as always, the rule of thumb remains that you must end a statement with a semicolon for the compiler to execute it.
Example:

Remainder
The operation is imperative in providing the remainder after performing a division of two integers.
We represent it with the % sign. Notably, this function is only operational for integers and not the float data type in Arduino code.
To use the operation, enter the following syntax: remainder=dividend % divisor; Check out the example below.
Division
It is the function to carry out the regular division of two numbers, which we represent with the slash sign (/).
Therefore, to carry out the division function, enter the following syntax: quotient=divider/divisor;
Check out the example below.

Addition
Again, as the name suggests, we use this function to determine the sum of two numbers.
The rule of thumb for its use is that you must apply it to two integers or numbers in the same data type.
Its sign is the addition sign (+), and here’s the syntax you require to apply it: value1 + value2;
Example:

Subtraction
Similar to the addition function, this allows you to find the difference between two numbers of the same data type.
Therefore, to use it, here is its syntax: value1 – value2;
Here is an example of its application on an Arduino Code.

Assignment
Lastly, we have the assignment function (=), whose role, as the name suggests, is to assign a value of numbers on the right side in relation to those on the left.
Its syntax is as follows: variable = value2;
Check out its example:

What is a Pin Mode declaration?
It’s a command whose primary role is to define the main functions of the Arduino input pins.
The PinMode Command has two main parts, the pins and the modes.
Pin
Any Arduino board has two main types of pins:
- analog pins
- digital pins
Modes
There are two main modes for Arduino pins. These include the Input pin mode and the Output pin mode.
Therefore, we have analog input pins and their respective outputs. Similarly, we have digital input and outputs.
FAQs
What is a Continue statement?
This function enables the compiler to ignore/skip all the statements you input below it upon fulfilling a particular condition per your specification.
Its syntax is ‘continue.’ Below is an example of its application.

What is the break statement?
The function allows you to break the loop upon fulfilling a particular condition.
Its syntax is ‘break,’ allowing you to start another loop. Example of its application on a code:

What is the return statement?
It’s the basis of operation of almost all functions as using it on a code line returns a value.
The return statement allows you to use any data type, although you must specify it when declaring the function.
Here is its syntax and example: return ‘value.’

Summary
An Arduino Syntax governs how you input code to an Arduino IDE programmer.
Also, notably, Arduino programming is similar to embedded C, meaning if you know C and C++, you can easily program an Arduino board.
That’s all for now, but check out more articles on Arduino on our site.